Spring Security OATH2
January 09, 2022
既然上一篇完成了piggymetrics的部署,现在开始学习这个例子中所涉及到的Security, 具体来说就是Spring Security + OATH2。
基本调用流程图
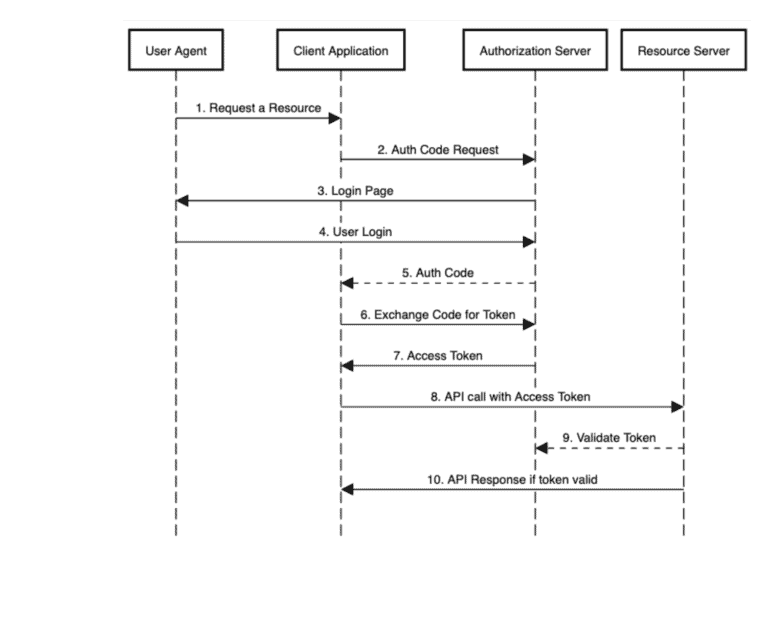
Spring Security + OATH2
Spring Security / Authentication
依赖如下:
<dependency>
    <groupId>org.springframework.boot</groupId>
    <artifactId>spring-boot-starter-security</artifactId>
</dependency>
这个的实现主要是通过继承 WebSecurityConfigurerAdapter 来达到的。然后Override两个configure方法:
    @Override
    protected void configure(AuthenticationManagerBuilder auth) throws Exception {
    	PasswordEncoder encoder =
          PasswordEncoderFactories.createDelegatingPasswordEncoder();
    	auth
          .inMemoryAuthentication()
          .withUser("user")
          .password(encoder.encode("password"))
          .roles("USER")
          .and()
          .withUser("admin")
          .password(encoder.encode("admin"))
          .roles("USER", "ADMIN");
    }
@Override
protected void configure(HttpSecurity http) throws Exception {
http
.authorizeRequests()
.anyRequest()
.authenticated()
.and()
.httpBasic(); // or .csrf().disable();
}OATH2 / Authorization
Authorization Server 和 Resource Server
<dependency>
    <groupId>org.springframework.cloud</groupId>
    <artifactId>spring-security-oauth2</artifactId>
</dependency>
或者在Cloud环境下
<dependency>
    <groupId>org.springframework.boot</groupId>
    <artifactId>spring-cloud-starter-oauth2</artifactId>
</dependency>
基于Spring Security 5,实现了对OATH2的最高级支持。依赖如下:
AuthorizationServer 主要逻辑是通过继承 AuthorizationServerConfigurerAdapter 这个类 以及 @EnableAuthorizationServer来实现的。
@EnableAuthorizationServer
@Configuration
public class AuthServerConfig extends AuthorizationServerConfigurerAdapter {

  @Autowired
  DataSource ds;

  @Autowired
  AuthenticationManager authMgr;

  @Autowired
  private UserDetailsService usrSvc;

  @Bean
  public TokenStore tokenStore() {
    return new JdbcTokenStore(ds);
  }

  @Bean("clientPasswordEncoder")
  PasswordEncoder clientPasswordEncoder() {
    return new BCryptPasswordEncoder(4);
  }

  @Override
  public void configure(AuthorizationServerSecurityConfigurer cfg) throws Exception {

    // This will enable /oauth/check_token access
    cfg.checkTokenAccess("permitAll");

    // BCryptPasswordEncoder(4) is used for oauth_client_details.user_secret
    cfg.passwordEncoder(clientPasswordEncoder());
  }

  @Override
  public void configure(ClientDetailsServiceConfigurer clients) throws Exception {
    clients.jdbc(ds);
  }

  @Override
  public void configure(AuthorizationServerEndpointsConfigurer endpoints) throws Exception {

    endpoints.tokenStore(tokenStore());
    endpoints.authenticationManager(authMgr);
    endpoints.userDetailsService(usrSvc);
  }
}
ResourceServer 主要逻辑是通过继承 ResourceServerConfigurerAdapter 这个类 以及 @EnableResourceServer来实现的。
@EnableResourceServer
@Configuration
public class ResourceServerConfig extends ResourceServerConfigurerAdapter {
    @Autowired
    private ResourceServerProperties sso;

    @Bean
    public ResourceServerTokenServices tokenServices() {
        return new CustomUserInfoTokenServices(sso.getUserInfoUri(), sso.getClientId());
    }
}
Piggy项目中的实现
基本按照上面描述。
-
目前AuthorizatioinServer的client都是放在内存中的,可以扩展为保存在数据库中,而且可以基于Group/Role。这里是个好例子。
-
自定义了userDetails,并且在Authentication和Authorization中都重新使用了它。但是自定义的User并没有涉及权限管理。只是说系统定义了三种针对不同Resource系统的User,做了个区分。前面的Controller使用scope来过滤而不是通常的
@PreAuthorize("hasRole('ROLE_XYZ')")或者@PreAuthorize("hasAuthority('XYZ')")
// Authorization
@Override
public void configure(AuthorizationServerEndpointsConfigurer endpoints) throws Exception {
    endpoints
        .tokenStore(tokenStore)
        .authenticationManager(authenticationManager)
        .userDetailsService(userDetailsService);
}

// Authentication
@Override
protected void configure(AuthenticationManagerBuilder auth) throws Exception {
    auth
        .userDetailsService(userDetailsService)
        .passwordEncoder(new BCryptPasswordEncoder());
}-
AuthorizationServer使用了默认的JWT格式
-
自定义了ResourceToken Service,是通过扩展
UserInfoTokenServices来实现的。
背后的逻辑
User
Group
Group Authorities to connect Group and Role. (Group_id, Role)
Group Memeber to connect Group and User. (Gruop_id, User)
Role/RoleHierarchy ---- High Level
Privilege ---- Low Level
要么基于Group,要么就简单直接基于Role/Privilege
Oauth client details ( client_id, client_secret, resource_ids, scope, authorized_grant_types, access_token_validity, refresh_token_validity )
Oauth access token
Oauth refresh token
上面这三个重要的就是第一个,oauth client类似与一个FID(functional ID), 确定了这一个大用户。OAUTH2的认证对象就是它,而我们之前创建的用户和Role怎么才能起作用呢?在这之前,要先把Resource Server启动起来,启动之前,要指定resource id.
security.oauth2.client.client-id=
security.oauth2.client.client-secret=
security.oauth2.resource.id=
security.oauth2.resource.token-info-uri=
里面的resource.id要和Oauth client details里面的resource_id对应起来,这样Authorization Server就知道oauth client到resource的关系了。
这样,当你执行如以下的命令时
curl --request POST http://localhost:8080/oauth/token \
     --header "Authorization:Basic YXBwY2xpZW50OmFwcGNsaWVudEAxMjM=" \
     --data "grant_type=password" \
     --data "username=john" \
     --data "password=john@123"
Authorization Server就会知道你是想以john的名义去access一个什么资源了,当然也知道john是什么Role了,也就可以产生包含这些信息的Token了。
Cloud Security
- Resource Owner — an entity that is able to grant access to its protected resources
- Authorization Server — grants access tokens to Clients after successfully authenticating Resource Owners and obtaining their authorization
- Resource Server — a component that requires an access token to allow, or at least consider, access to its resources
- Client — an entity that is capable of obtaining access tokens from authorization servers
上面涉及到了前三种,其实第四个通过使用@EnableAuth2Sso或者@EnableAuth2Client也可以达到,在piggy例子中,三个service project都即是Resource Server,又是client。因为它需要获得token然后才能提供相应的resource。
Zuul
一般都是用Zuul来转发token,如下所示:
@Controller
@EnableOAuth2Sso
@EnableZuulProxy
class Application {

}在piggy的例子中,外面使用OAuth2RestTemplate来转发token context,内部通过OAuth2FeignRequestInterceptor让Feign自己来处理。
